A while back while waiting for a subway train, I watched a pigeon peck around here and there. He (since all pigeons are “he”s, at least to me anyway. And, yes I realize there is a slight flaw in my logic), bumbled around and, flustered by the oncoming train, even fluttered about the platform without any real purpose.
He looked casual as most pigeons do. Casual in the sense of “I am not looking at you,” “I am not looking at you,” but as soon as the coast seems to be clear here I come to rush the crumb of whatever it is that you just dropped. It has to be a tasty morsel! …or…a pebble you say? No matter, I was just casually passing by. I experience this behavior time and time again while having lunch near a small fountain surrounded by steps and various types of birds- none of them quite as casual as the pigeon.
Once the train settled into an indefinite stop, normal for a train hub, the pigeon settled itself back down on the platform. Still roaming looking for a handout, he began hopping in and out of the opened door of the waiting train car. I watched from a distance, this game of chicken he was playing, tempting the doors to close.
When the doors finally did, he, the pigeon was on board. I wonder what thoughts went through his head as the large metal doors slid shut with him on the wrong side of them. Where was he headed?
Maybe this was his plan all along. Him screwing up the courage to take that step, playfully almost so as not to bring on the anxiety of knowing full well that this was going to be a life changer, a journey of a lifetime. I wanted to be on that train, to be an observer of his wondrous train ride, but instead I was left in time on the platform, the pigeon’s train moving into an unknown future.
Am I just personifying my fellow pigeon? (A cardinal(?) sin when observing wildlife- even the life of a pigeon). Or was it a projection of my own dreams- getting on that train and taking the first step toward something new? This is possible as well. I cannot imagine what wondrous things the pigeon experienced, but as the train pulled away, I felt elation, a ray of hope that maybe I too can take that playful leap.

Friday, January 27, 2012
Monday, January 2, 2012
Gnawing at the Walls- Gingerbread House (recipe)

Continuing my immersion into all things gingerbread, I made my very first gingerbread house. Just like any other house (I would imagine) it takes proper measurements, planning, patience and lots and lots of mortar, or in this case, icing.
Be prepared. Have a serrated knife, a form or a really good eye for measurements and some free time. You can be as creative as your mind, budget and supplies allow. Since I have access to a couple candy stores, I was in good company.
Have all your basics ready to go (e.g. your base for the house, your royal icing, your gingerbread dough, and things to brace your house while building and allowing the icing to dry). If you are ready, it will be less frustrating and your roof will more likely than not remain attached.
What you will need (mind you, this IS an art project, my suggestions are just that, suggestions).
1) Board for the house. I went to my local craft store and found a foam poster board that I cut in half and covered with aluminum wrap. This way, I can use it again once this one has been consumed.
2) Royal Icing:
Ingredients:
3 tablespoons meringue powder (you can find it at your craft store or specialty food store)
4 cups powdered sugar
6 tablespoons warm water
piping bag(s) or plastic sandwich bags with a sealing device (e.g Ziploc)
food coloring for coloring icing
Preparation:
In a large bowl combine all ingredients and beat using a handheld mixer until the icing forms peaks. approximately 10 minutes.
DO NOT LEAVE UNCOVERED ONCE READY. It is your mortar, it will solidify and become useless if you leave it out. Put it into your uncut piping bag and seal it or place it into a airtight container.
Gingerbread Dough Preparation- dough can be made the day before:
Ingredients:
6 cups flour
1/2 teaspoon baking powder
1 teaspoon baking soda
1 cup butter (unsalted), softened
1 cup brown sugar
4 teaspoons ground ginger
4 teaspoons cinnamon
1 1/2 teaspoons ground cloves
1 teaspoon black pepper
1 1/2 teaspoons salt
1 1/2 dark unsulfured molasses
2 eggs
Preparation:
Sift together the flour, baking soda and powder in a bowl, something large enough to hold 6 cups of flour. (the "Dry Ingredients")
In a separate large bowl, combine the butter and brown sugar. Once well creamed, add all the spices (including the salt and pepper). Beat in the eggs and molasses. (the "Wet Ingredients")
Slowly add the Dry Ingredients to the Wet Ingredients. Mix until well combined.
Break the dough up into approximately 1/3s, wrap each separately in plastic wrap pressing it flat and round (for easier rolling later) and refrigerate for at least 1 hour (or overnight).
When the dough (and you) are ready, preheat the oven to 350 degrees Fahrenheit.
Only take out the 1/3 you are planning on working with. That way the other pieces stay solid. Roll out the dough on a well flour dusted space. Have your forms ready to go. If the dough is sticky, put it back in the refrigerator.
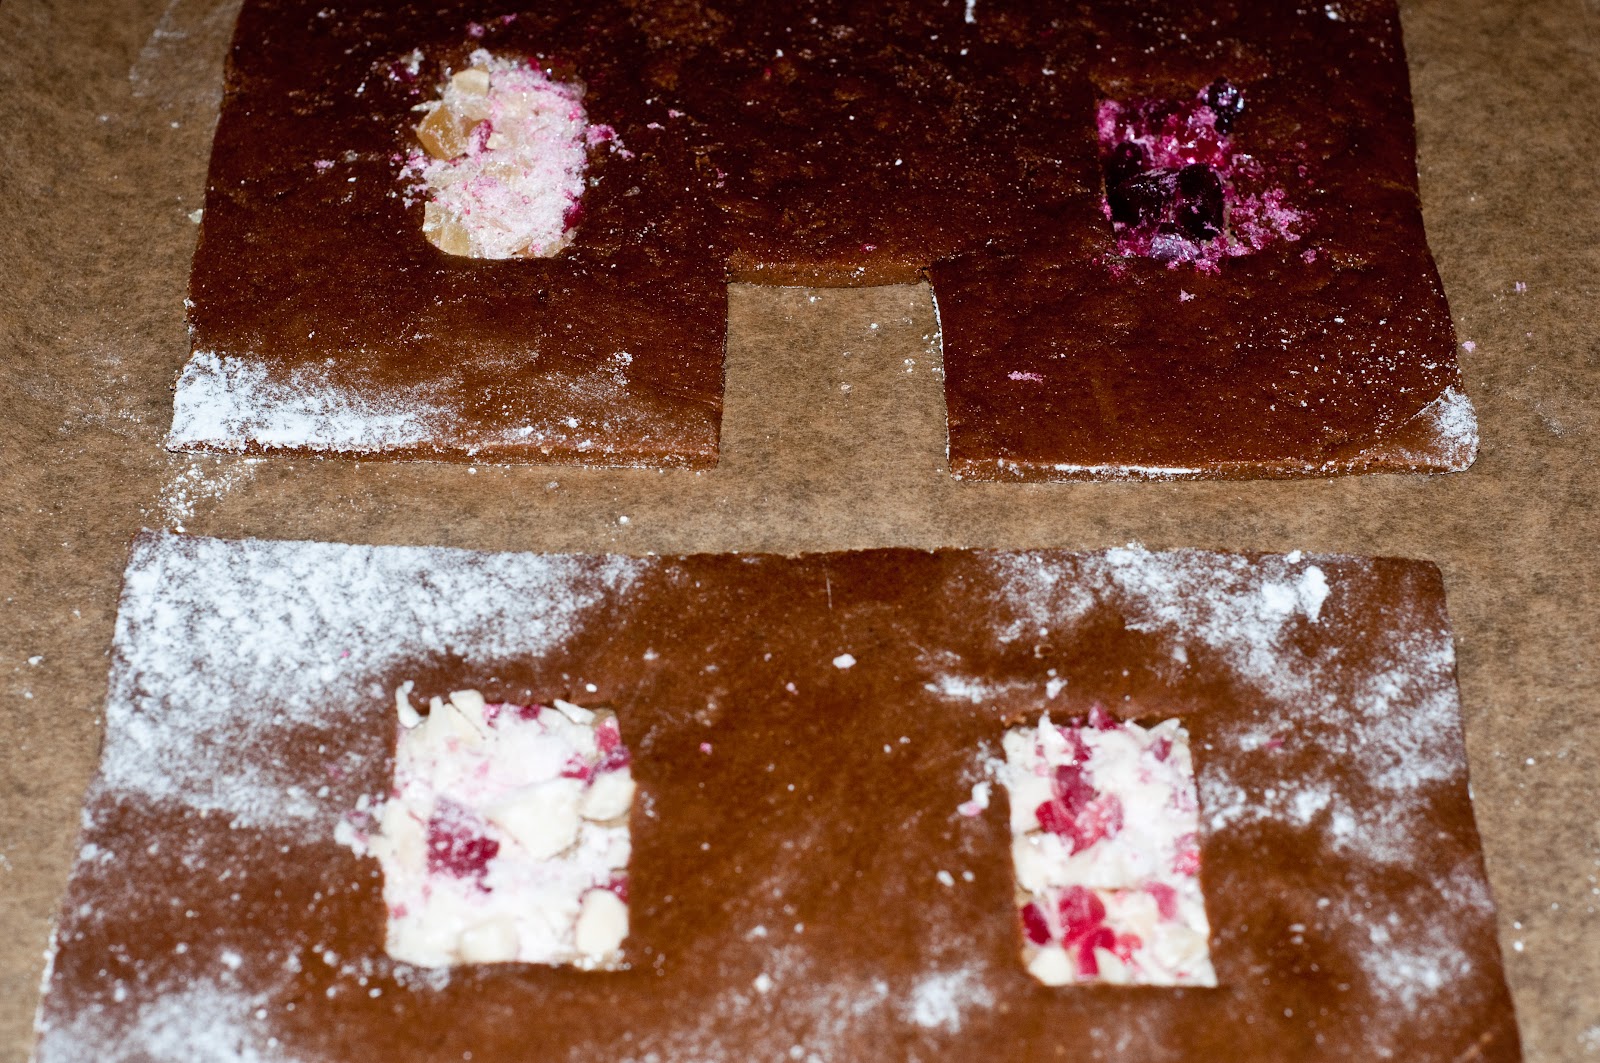
Roll the dough out to approximately 1/4 thickness. Place your forms on the dough and carefully cut out your shapes. Use a sharp knife- it just cuts cleanly. Cut your windows and doors out at this point. Be as creative as you want. Place each cut out on your parchment covered cookie sheets. Chill on the cookie sheets for 10 minutes or so, if you can. Not necessary, just helpful.

If you want to get fancy, you can crush up hard candies and place them in your window openings to get the stained glass affect. Any color will do. I used suckers, but any hard candy will do. This is great if you are planning on lighting your house (or adding the battery operated candles)
Bake for approximately 15 minutes, or until firm.
Remove from cookie sheet, once slightly cool enough to touch, use your cutting board and serrated knife to clean up the edges. Saw at the pieces gently, you don't want to break it into pieces. It will make it significantly easier to build your house with clean lines. Then place on cooling rack and allow to completely cool.

It will take a couple rounds of cutting and baking to make your entire house.
Construction of your edible home:
Have your icing ready, cut a SMALL hole in the piping bag. Small is better. Place your decorating board on a flat surface and have all of your home pieces ready to go in the same location, along with supporting props (e.g. cups, books, jars, whatever will help hold the walls straight while the icing is drying.
Generously ice the bottom of your first wall. Place it firmly on the board. Then along the base of the board and the first piece, pipe more icing. Have your supporting prop next to the first side for this.
Next, ice the bottom and corresponding side of the second piece of the house to form a 90 degree angle. Press the second piece firmly, yet gently to adhere to your first piece. again, have your prop ready.
Keep adding your sides like this. Wait until your walls are fully secured and dried before you add the roof. You don't want it to collapse after all that hard work. It will take between 4 to 8 hours depending on the humidity to become secure enough to add the roof.

Once dry, you can begin decorating the roof of the house and its surrounding area. I wanted a wintery scene so I added some further decorations.

Candies and such used:
ice cream cone (tree)
white chocolate covered malted balls,
hard candies, blue for creek
vegan marshmallows, snow bank
graham cracker sticks for wood pile
candy covered chocolate rocks for walkway
yogurt covered pretzel stars and balls for house decoration
marzipan for dog and cat
cinnamon toast crunch cereal for the thatched roof
shredded coconut for snow
to add the snow and make it stick, you can thin out some of the icing by placing a teaspoon of icing in a small container and adding water until it is quite thin. Then, with a basting brush, paint with the icing where you want the "snow" to be.

It is a great project and lots of fun. Some great sites where I found some ideas, tips, recipes, and most important forms, are found here, and here, and here and here.
Subscribe to:
Posts (Atom)